Journey to a Great City

So 4 stars down! As part of our visual week, I was going through the Visual Assignment Bank and the Story Map really caught my eye. I I was quickly running through different trips that I took that would fit perfectly into this, and I couldn’t stop thinking about my trip to London back in January of this year. I went with my grandparents for a week. We went all over the city and even made it to Greenwich to visit the Prime Meridian. I was trying to piece together where we went and when/what day we went. I think I got it pretty well. A favorite part of this trip, I was able to take my dad’s Canon Rebel camera with me. I really like take photographs and I think this trip really help me develop in those skills. So as I was looking back at the different photos to include in the story map, I could see how much fun the trip really was and the memories that we made! So after I finished putting together the different pictures, I went to add the map to the blog. However I ran into a snag. The code that’s given when you go to share the map doesn’t show up in the wordpress format. So my immediate thought was to jump to twitter and ask Jim Groom if he know how to help. Luckily I wasn’t the only person who was having this sort of trouble. John Meadows a fellow ds106er was doing his story map about his honeymoon. A few minutes after I tweeted Groom about the problem I was having he tweeted the same thing! So we went back and forth replying to each other’s tweets and we got to this conclusion:

tweets


Down here is where the map should go (if it ever loads)! I will check back here once I do some more troubleshooting on how to get the map itself to load. But you can find the map over here on the Knightlab Timeline website! I really enjoyed making this assignment, it brought back a lot of memories from this awesome trip to London! Enjoy!


My Honeymoon (My Story Map Assignment)

What’s up ds106?  Hope everyone’s week has been going well so far.  For my Story Map assignment, I though I would use some pics from my honeymoon in Aruba last year.  Hands down the BEST TRIP EVER, largely because of who I went with, but also because it was a beautiful island and everything went perfectly!  To do this assignment, I used the KnightLab Story Map app.  The actual creation was very straightforward, as the app pretty much walks you through the process.  I really enjoyed making this, and have some other ideas about smaller trips with less pics (I have 300+ pics from my Aruba trip, so making a full slideshow will be pretty difficult) that I can make in the future.


My Story Map


http://cdn.knightlab.com/libs/storymapjs/latest/embed/?url=https://c81d8670a134dec0a26f33919781f06f7383fe9e.googledrive.com/host/0B0sOQAgVPyjMQjl5eV9hb2lvQlU/published.json


Hope everyone has a fantastic end to the week!  Later ds106 community!

Darwin’s Exceptions

There are some people in the world that really make you question humanity. Some people call them Darwins Exceptions and others just say “You’re doing it wrong.” The title of this assignment is “You’re doing it wrong.” I had to find  a picture of someone doing something that was just absolutely wrong. I witnessed and event that made me think “Did that really just happen?” I chose a similar picture to the event.


Doing it wrong

I was at a gas station and I heard a noise that sounded like something hitting a car. I looked at the car across from the pump I was at and a lady drove away from her pump with the nozzle still in her car. She didn’t rip it off of the pump like in this picture, but she quickly got out of her car and looked so embarrassed. She quickly  put the nozzle back into the pump and drove away. I wanted to laugh so bad but I kept a semi straight face. Once she was gone I cracked up.

Red Stands Out, Right?

Finally! My last visual assignment for this week! This week i’ve been getting too comfortable with GIMP by simply cropping and adding text. I felt like with my last visual assignment of the week i should do something i haven’t done before. I mean, this class is about becoming familiar with different skills, right? RIGHT. I decided to go with “Splash The Color” worth 3 stars. Let’s get to it!

The Picture:

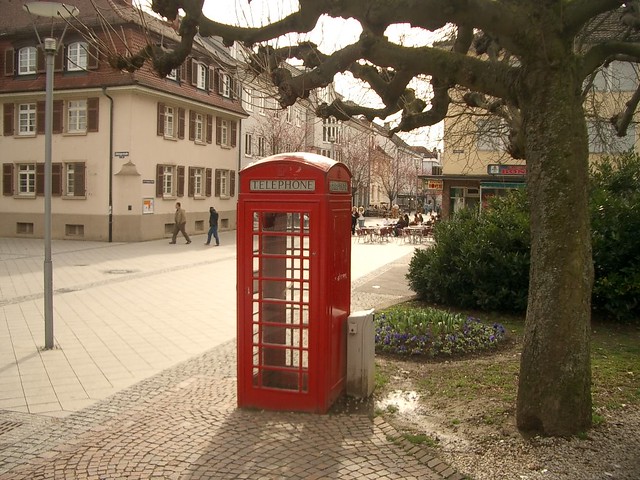
Finding a picture that has a main focal point is pretty easy. The hard part is finding the right picture, at least for me it was! I was looking around my room for some inspiration and made a dead lock on my poster. It’s of a double deck bus roaming the streets of London. What else is red and stands out in the London? Phone booths! As i searched on google for a simple British phone booth, there were some where the background was already grey and the booth was a bright red. This discouraged me a little bit but i still wanted to do it. Don’t worry, i didn’t just download that picture to my computer and put it on Flickr! I promise. Now that i chose my picture, i needed to figure out how to do this whole splash of color thing, so i searched on YouTube.

The Process:

This wasn’t as bad as i thought it would. I’m not a big fan of Photoshop because i don’t feel like getting a 30 day trial and then having to stop using it. Since GIMP is free, i’m sticking to that. Maybe if i become a big photo editor one day i’ll buy Photoshop. Back to the process, here it is! I found this GREAT tutorial on YouTube right here. Since most of the online tutorials involved Photoshop, i quickly stuck to this one. Now this nice guy offers two choices on the whole process. I attempted to do the first one, but it wasn’t as easy because his operating system is windows and not a mac, like me. So skip to 2:46 and you’ll be better off, trust me.

Duplicate The Layer

Ah, yes, Like the title says, the first step is duplicating the layer. It’s really simple, trust me. Just go under the “Layers” tab and select “Duplicate Layer”. What this does now is adds the exact same picture on top of your current picture. You know, like duplicates it or something. Now you’re good. Under the same “Layer” category, you want to scroll down to “Transparency” and select “Add Alpha Channel”. Sound familiar, right? It’s the same thing you need to do when you’re cropping out faces. What this “Alpha Channel” does is it allows you to erase the top picture and when you do so, it reveals the second picture and not just a plain background. YAY! Next step!

Colors

Mhmm. Colors. That’s what this whole thing is about, right? Your next step is to go under the “colors” or “colours” if you’re british, and selected “desaturate”. Although you bio geeks might think this involves Carbon and Hydrogen bonds, not exactly. Next it’s going to ask you what kind of desaturation. I chose “Luminosity” like the video said because it makes the picture pop. Now you can begin erasing.

Erasing

Finally, let’s get those colors to pop. Take the eraser button (making sure it’s not too big) and erase the object you wish to have color. For me, this was the red phone booth. This step is the trickiest because you want to be careful to stay in the lines. Once you go out, now you’ve added random color splashes to the background. This happened to me. Need not worry! There is a kind of simple way to fix this. Once you’re done erasing the object, click on the paintbrush tool. What you need to make sure is that you’ve changed the color of that paintbrush to a similar tint of what you want to lack color. Like i said, this happened to me. I attempted to fix it but it’s still a little obvious. But that’s okay! We’re not professionals. WOW! Now we’re done! The moment you’ve all been looking for. My “Splash The Color”.

Before 

british phone booth with color

After:

british phone booth color splash

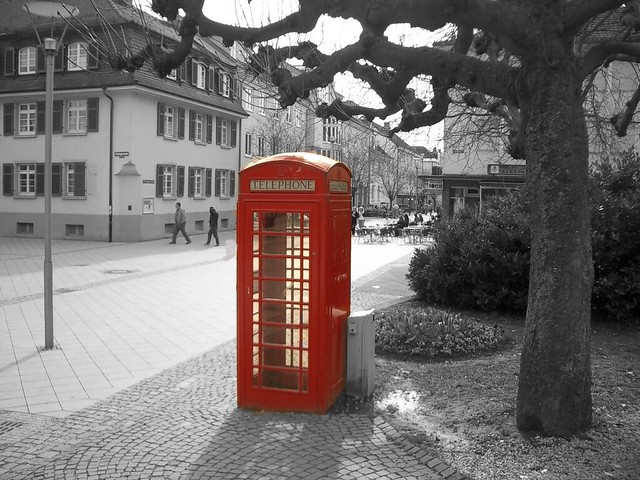
Now, tell me if you can spot my mess up. Actually, no. Don’t ruin this for me. I’m too proud!

Stars: 3

Minimalistic Ice Cream


Minimalistic ice cream

I started the assignment 4 Lines, 5 Dots, 1 Curve (worth 4 stars), thinking it would be really difficult to think of something to make with those limitations, but then it came to me…ice cream! I’ll admit I could have been a little more creative with this assignment, but I did want to make something recognizable. The cone uses three lines, the ice cream uses the one curve, and the last line, and then the chocolate chips are the five dots. Mint Chocolate Chip is my favorite ice, especially from Baskin Robbins and so I decided to make the background pink as an homage to Baskin Robbins. I used Pixlr to create this drawing and simply used the shape tool to make my lines and my dots and my one curve. Then I put a vignette filter over the cone to show that it had been baked more in certain areas, and I added noise to the ice cream to give it that frozen kind of texture.


twitterredditpinterestlinkedinmail

Wombats Can Sing, Kind Of

Two visual assignments down, only 2 more to go! I think. It took me a lot longer to find another visual assignment that i found interesting. After going through like 4 pages, i found this assignment. I was a little suspicious that it was 4 stars.. So i’m not taking any chances and i’m doing more than 12 stars. There are only two things i needed for this assignment: A good song and great lyrics. Most of you may think i only like 80s post punk revival or just anything that isn’t modern. Well, i hate to break it to you, but i enjoy pop music too! To an extent, that is. I like pop punk and rock pop. This is where one of my favorite modern bands come in to play: The Wombats. They’re an energetic band from Liverpool, England. If you haven’t heard of them before, i beg you to look into them. ANYWAYS. Here’s my assignment!

1. The Song:

It was difficult for me to choose a song from The Wombats, to be honest. I decided to play their albums on shuffle through itunes and whichever song came first, i chose for my assignment. Luckily, one of my favorites came on: “Tokyo”. It’s just an overall great song that’s catchy and insightful. The second hardest part was choosing which lyric. Again, i left this up to chance because i couldn’t decide. I held down the fast forward button for a good 10 seconds and when i released it, the lyrics “Back to that bar in Tokyo where the demons from my past leave in peace”. Yay! those are some pretty good lyrics to work with. If you want to see all the lyrics, here they are. Now, if you’re an even better person and want to hear the whole song, here it is! I highly suggest you listen to it


2. The Picture & Font

Now that i chose the lyrics, what picture best represents those lyrics? When i think of Tokyo, i think of the pacific “Times Square”. Serious bright lights and crowds of people wondering around. Well, when you listen to the song it’s all about seeing who the real you is and just overall finding yourself. This isn’t necessarily a good thing because like the lyrics say “where the demons from my past leave me in peace”. Basically what i pictured for this was a fancy, hip bar. So i simply googled Tokyo high fashion bar and that’s where i got it from! I uploaded this picture to GIMP and my next step was to find the right font. I scrolled to the bottom of the list and stuck with a fancy curvy one. Makes sense, right? So i added that text layer to the picture and boom! my final piece! I think it came out pretty cool. I’m definitely not biased or anything.

"Tokyo" by The Wombats


Stars: 4/3.5

Take Me Back to (8-bit) Paradise: Take Two

After Groom said that my other 8-bit post was too small, I tried it again with the same picture hoping to make it easier to make out. I did it the same way, imported the picture into GIMP, resized it–this time to 1000×1333–then pixelized it (20×20 pixels) and voila. Here is the first try:

8bit picture

Here is the second try:

8bit picture take 2

This one may be too big. It is hard to get it just right because it is zoomed out in GIMP. But, hopefully this one is easier to see!

Brewing Passion Ice Tea

Brewing Passion Ice Tea

I did the visual assignment “Photo It Like Peanut Butter,” which is worth 3 stars. To do this assignment, I checked out a DSLR camera from DTLT (just to experiment with) and I set it to “continuous shot” mode that way I would be able to kind of recreate the process the process of getting video frames. I held it down after I poured the hot water in the glass, and captured 16 images of the tea brewing. Next, I imported those images into Photoshop as a “stack,” meaning they imported in as layers. Then I clicked the drop down menu above the Timeline in Photoshop to make all of my layers frames in the Timeline. Next, I selected all of my 16 frames and cropped down the image of the glass to focus in on the tea bag and on the brewing tea swirls. After that, I resized the image width from around 3,000 pixels to 800 pixels. Then, I adjusted the delay speed of all of the frames to 0.1 seconds. Finally, I “saved to web” and saved my project as a GIF.

I really need to get a tripod to put cameras on…that would have definitely made the photo shoot easier and it would have made the gif sequence smoother. It’s also weird to make a GIF from pictures only instead of a video, mostly because in my limited GIFfing experience I’ve only used videos to convert into GIFs. Nevertheless, I am happy with the way it turned out. I really wanted to depict the subtle movement within tea brewing and I think I accomplished that.

twitterredditpinterestlinkedinmail

FDR and JFK Were Around Then?

Visual Assignment 2! This one was great. Just the assignment itself was hilarious because i love both historical figures and disasters. What mostly attracted me this assignment was the whole idea of cropping. I get the hang of cropping when i completed the “Me and Bae” assignment where i cropped out Stringer and Avon into the bodies of Will and Jada Smith. Of course if i didn’t do that assignment, this one would have taken me twice as long. Surprisingly, there were no hiccups when i created this so i pushed my luck and made two separate photos. Good thing i’m a master with GIMP because i’m seriously proud of both of these. I might secretly make the FDR one my screen saver.

Crop 1: FDR & Pompeii 

As you can tell, this is a picture of our famous 32nd President Of The United States of America. FDR is hands down my favorite president so i had to choose him. The only problem was, what do i pick as a background? I thought it would be funny to pick something way out him time zone so i chose the eruption of Mt. Vesuvius. I know i shouldn’t be as proud of this because a lot of innocent people died, but ah, come on
 Especially the way i rotated FDR, it almost looks like he’s coming out of the volcano.

FDR & Pompeii

2. JFK & Twister

Like the title says, i chose JFK as my next victim. He is my second favorite president, right behind FDR. The background i chose for this was just a simple tornado. I wanted to pick natural disasters rather than acts of violence so i strayed away from wars and such. I think this picture looks really good, so feel free to save it to your computer. ;)

twister & JFK


GIMP:

I’ve used GIMP before in a prior assignment which uses the exact same steps of cropping, so here they are!

Cut Head:

What I did here was open GIMP and chose the scissor icon thinking it would cut, and yes, it did! I cut around Avon and Stringer’s heads. After not knowing what to do next, I watched this tutorial which helped me a lot.

Layers: As the tutorial says, you go under the “Layer” menu and choose transparency then choose “Add Alpha” which I did.

Select: Now you go under the “Select” menu and choose “Invert”. After invert you now have the background selected. Now go under “Edit” and press clear.

DON’T FORGET PNG LIKE ME!: Now, Please
 Please
 don’t forget to save the image as a PNG so the background is not white. I was stuck on this for almost 2 hours wondering why my background wasn’t transparent. Then after emailing/tweeting/bothering Groom, he gave me his words of wisdom. Keep in mind, this whole process is just for cutting the heads out
. There’s more.

Open As Layers: Yes, open the pictures as layers. From here, you select the tool that is for moving layers and you shift the floating heads over the bodies of the soon to be headless. That’s really all it takes. I wish i could say that with more sincerity but this process was frustrating for me. Hopefully you will avoid frustration.


ENJOY!

Mirror Mirror

Ah, GIMP, we meet again. For my first visual assignment, i wanted to parallels because that was one of the things we discussed in the live tweeting which i blogged about here. The visual assignment was created by the man himself, Groom. The basic idea of this assignment was the find parallels between movies, shows, etc. It would be easy to find them between various episodes in The Wire so i wanted to make this hard on myself. I decided to look for parallels in  Episode 6 of Season 2 because that is the first assigned episode this week. So let’s begin!

The Scenes:

When we were doing the live tweet, Groom said that in the beginning of the episode when the unit meets it parallels a scene with D. Well, since i watched the episode before hand, i knew it was the scene where they’re discussing The Great Gatsby. So of course i chose this scene for the assignment. Obviously the two scenes are different in many ways. First: There is a group of policeman vs. a group of felons. But, they’re all human, right? Right. This leads me to the idea that the police unit and criminals are linked by the law. The unit is meeting to discuss the case while the criminals are meeting to expand their minds. Yes, they’re criminals but like Groom mentioned in his tweet, they’re more than criminals. They’re slowly becoming deeper people, especially D. Before D went to jail, he said he wanted a new life, for Wallace. In jail, he shows this by becoming involved in the library and group discussions like this. Here’s my picture!

Screenshot Parallel

For my second scene, i had a lot more trouble finding a parallel. I was stuck on the whole idea of D dying because that blew my mind. I wasn’t surprised, to be honest. D had it coming since the minute he got caught up in all the drama with his family. Beside his death in the episode, there was another scene that tugged at my heart. When Mrs.Barksdale came to visit him and talk him out of his rebellious stage, the real D came out. He told her exactly what was going to happen with him, in the sense that he won’t be playing by their rules. D never belonged as one of the Barksdales and i feel this scene convinced me so. I’m not really sure if this is a parallel or not but this scene where D and his mom touch hands relates to the scene where D dies in 2 ways. 1. D is saying some sort of final goodbye to his mom. The moment is very sentimental. 2. The guy next to him overhears his conversation about Avon messing with the dope and that’s why he dies. Whether this is a parallel or not, they’re link for sure. I also noticed that his hands are in his pockets when he dies. That’s kind of cool too. Bam!

Parallel screenshot 2

The Process:

My past experiences with GIMP haven’t been the best, to be honest. But this was a fairly simple task. I first had to screenshot the desired scene with my laptop. All i had to do was press (command+shift+4) and select what i wanted. I did that with all my pictures. When i wanted to combine them, i opened my first screenshot and expanded the canvas size. To do this, i just went to “image” then “scale canvas size” and scaled it appropriately. After that, i went to “file” and chose “open as layer” and picked the second scene for the picture. I moved the layer over and mashed the two scenes into one. For my first set of pictures, i added the text to tell you what time each picture was taken from. I didn’t do this for the second one because i made the second set a lot smaller but every time i attempted to resize the font, it wouldn’t work. :( I kind of got frustrated and just left it since all my pictures came from the same episode. Anyways, there it is!