I Hate…GIMP?

GIF #2

Google. The most popular search engine in the world. The question is, what do people Google on everyday basis? For this assignment I had to type in the phrase, “I hate…” followed by a letter of the alphabet. Some of the results were very strange. For example, in the GIF below if you look carefully for the letter ‘W’ one of the suggestions was, “I hate when I’m studying and a velociraptor…” I chose to do this assignment because as much as GIMP and I don’t get along, I wanted to give it another try. It ended up going better than expected. You could say GIMP and I have a love hate relationship. I also chose this assignment because I was interested in discovering what the results would be after the phrase was inputted.

This time around using GIMP wasn’t as awful as my previous experiences. GIMP was easier to use because for this assignment I was required to use images, rather than a video. Below is the step-by-step process I used to create my GIF.

Instructions

**PSA this assignment involves a lot of screenshots. In order to not get confused when uploading rename them and put them in chronological order**

Step 1: Go to ‘File’ and click open to upload your FIRST image


Step 2: For your SECOND+ image(s) go to ‘File’ and click ‘Open as Layers’. Once you do this you will see all the pictures appear on the right hand side bar

Step 3: Once I uploaded my photos from letters A-Z I watched my GIF. In order to do this go to the ‘Filters’ tab. Once under ‘Filters’, go to ‘Animation’, then select ‘Playback’

Step 4:  Once you select ‘Animation’ your screen should look like the picture below. Hit the ‘Play’ button to observe your GIF.

Step 5: Next go to ‘File’ and select ‘Export as…’

Step 6: Name your document. At the END of the document name make sure that you put the extension .gif This is shown in the image below. Then click the ‘Export’ button.

Step 7: Once you click ‘Export’ a pop up box should come up like the one below. Make sure that the  ‘As animation’ box is checked off.

**Another note–you might need to edit the delay between frames because the GIF might be too fast or too slow. I set mine at 650 milliseconds**

Link to assignment is tagged above in ‘GIF #2?

What Are the Chances

GIF #1

For our first GIF assignment I decided to base it off one of my favorite musicians, Chance the Rapper. The video I used is from the music video, May I Have This Dance by Francis and the Lights featuring Chance. I chose this video because most of Francis and the Lights music videos are very minimalistic, which I enjoy. This clip was a little different because Chance gives the video a more playful vibe, while keeping the minimalism of the other band.

At first I chose this assignment because I wanted my first GIF to be somewhat easy. I was wrong. Finding the clip and the specific part I wanted to use wasn’t a problem, it was creating it. Towards the beginning I had decided I was going to give GIMP another try, but all the tutorials I watched were instructions on how to convert images not videos. So I decided to use a different method. Below you can find instructions on how I made my GIF.

Direction 1: To begin, go to this website and enter your video URL, in my case it was May I Have This Dance by Francis and the Lights featuring Chance the Rapper.

Direction 2: Once you upload your URL your video should appear. Pay attention to the start time and the GIF length settings below.

Direction 3: Adjust the start time setting to 2:14 and the GIF length to 7 seconds

Before adjusting the settings

After adjusting the settings

Direction 4: Hit the ‘Create a GIF’ button and then select the download button. Located in the bottom left hand corner.

Link to assignment is tagged above in ‘GIF #1?

Exploring London 28/01/17

For this assignment I had to create a video of the a “day in my life” which meant filming what I did or what happened during a particular day and editing it together into a video.

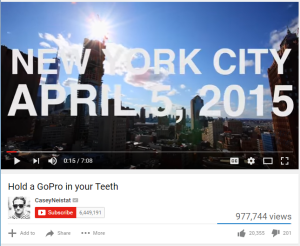
When thinking about this task I took inspiration from the YouTubers Casey Neistat and Sam “SeenThroughGlass” (who I ended up seeing while filming). When Casey used to create daily vlog videos I would find that his cinematic shots, especially the use of timelapses along with his general fast-paced editing style would make the videos engaging and fun to watch. I also wanted to take inspiration from his “intro sequence” to his daily vlogs where he would simply write the video location and date over the a particular shot. With Sam’s videos I take inspiration from the cinematic shots he uses to break up his vlog style shots since he always uses interesting camera angles and shots.

casey

Screenshot example of Casey Neistat’s opening sequence from this video.

When thinking about the video I wanted to create I had a few ideas of what I wanted to include: Firstly I didn’t particularly want to include myself talking to the camera since I don’t like doing it but instead use point-of-view shots to add a personal feel that it is of my day. This meant I would have to edit the cinematic shots to music as the assignment suggested to engage viewers while using interesting camera shots/angles to get the viewers attention.

To film the video I would be using my Samsung S4 phone, a GoPro Hero 4 and a Canon 700D camera which would potentially pose some issues with differing video looks and video quality. However I felt that this differing quality wouldn’t matter since the video was about making the video to show the content/story and not necessarily to make a polished flawless product. For example on many social media platforms like YouTube, Instagram & Snapchat it’s more important to users to make a bad quality post rather than not to post at all. For example how Casey Neistat keeps filming and uploads it when his external microphone breaks even though the sound quality is worse like in this video or adds in phone shots like in this vlog since it’s better to have the worse shot to make up the story rather than leave parts out because it’s not as high quality. Alongside this something about creating the video which would be difficult for me to do would be making the video solely out of video footage filmed over that one day (since I was doing other things rather than just focus on filming) and also to edit using the footage in roughly the same order it was filmed to create a logical story throughout the video which is not something that I usually do.

During the day while filming it was slightly tricky remembering to try and film every single thing; especially in front of other people in the street when “aimlessly filming” my surroundings. I think I managed this to an extent as I took quite a bit of footage however it would have been useful to have recorded more so that there was better choice during the editing.

For the edit of the video I mainly used Sony Vegas Pro 12 but however used Adobe Premiere CS6 for the editing of some of the timelapse sections. I started out by importing all of the video clips into Vegas and began putting the first few onto the timeline. After the first few I placed the intro scene using a timelapse clip that I sped up using the rate stretch tool in Premiere, added text over it and then went in search of a piece of music which could be faded in here for the rest of the video to be edited to. This chosen song was “Seinabo Sey – Pistols At Dawn (Lucian x Mickey Valen Remix)” which I’d heard before in this video and was good since it has quite regular beat/vocal changes which can be edited to. After this was inserted then I dragged the other video clips on the timeline and set about editing them together using a variety of tools such as the orange markers for positioning important cuts, trim tool for resizing clips and fade tool to fade between clips. Some of the video audio was then muted while some was isolated and increased in volume to make it audible above the music.

To create the best video possible I then set about stabilising (where possible) and colour correcting some of the video footage to make sure it looked as good as possible. Some of this colour correction was done using the standard “Sony Colour Corrector” plugin while some like the example below was done with the more advanced Magic Bullet Looks plugin.


colour-correction-exampleScreenshot of the video before (left) and after (right) the colour correction process.
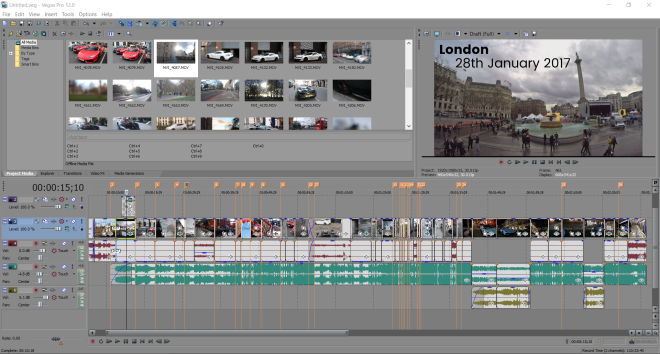
Visible below is the finished Sony Vegas project file for the video which shows all of the used clips and editing within the timeline:

Timeline.PNG


Embedded below is the finished video assignment:

Riley’s Unfortunate Flip

I had a lot of fun with this assignment. I had to choose a video and edit an instant replay into it. I knew just the video I wanted to use. My friend Riley has this video of him attempting to do a flip off of a stump, but he missed the landing. He sent me the video and I used Windows Movie Maker to copy the part I wanted to slow down, set it to 0.25x speed of the original, and put it all together. Here’s the video:

On the Daily…

This assignment had me record a video highlighting one thing I do every day. I chose to film myself checking my email (while making sure no sensitive information was visible). I was going to film it all on my phone, but I realized that I can’t flip from the front to the back camera while I’m recording a video. So, I recorded myself using my webcam on my computer, then recorded my screen with my phone, then put the two together in Windows Movie Maker. Like browsing Tumblr, this is another thing involving the internet I do every day. The internet has become quite a necessity in our daily lives. Email is extremely important. Here’s my video:

Favorite Internet Thing To Do

One of my favorite things to do that involves the internet is to browse through Tumblr. It can be very entertaining and interesting. This assignment had me record a video demonstrating this. I was going to film it all on my phone, but I realized that I can’t flip from the front to the back camera while I’m recording a video. So, I recorded myself using my webcam on my computer, then recorded my screen with my phone, then put the two together in Windows Movie Maker. Here’s my video:

Video Essay on Rue’s Death in the Hunger Games

For my video essay, I had to think about movie scenes which were especially powerful to me. Instead of doing multiple scenes, we were to pick just one. I came up with the scene from the Hunger Games where Rue dies. It is an incredibly powerful scene. I used Audacity to record my commentary on the scene, then I used Windows Movie Maker to edit the video and the audio together.

Here’s the completed video with commentary:

First People Drawings

This assignment took a spin on the six word story and six word quote ideas and had me do six second art. This was a tough one, not because of the art but because it took me like ten tries to fit what I wanted to draw into only six seconds. I thought a fun idea would be to draw what I used to draw myself like when I was only four or five years old.

Go Roller Skate Go!

For this assignment, I had to take a video with Vine of a moving object. This might be the last time I am able to do this because I heard today the Twitter is discontinuing Vine! It doesn’t make sense because so many people use Vine. I decided to take a vine of my roller skate because they are brand new and I love them and I want to show them off.

Sign Language

For this assignment, my mission was to spell a word in sign language. I came up with a word immediately, but I realized that there was actually one sign for the specific word, rather than spelling it out. This word is one of the few words I know in sign language, and I learned it from someone in my high school German class. Can you guess which word I’m signing?