Assignment 6 – Mapping it out – #edtechcca6

Make a custom map using Google Maps.

Use Google Maps to create your own custom map that includes photographs of places.

I’ve been playing with google maps and the google maps api for a while so was please t osee some familiar territory for this Assignment.

This afternoon Dorothy, my wife, and I took a walk round Ardinning Loch, we do this nearly every week often twice a week in the summer, It is a short walk that is always interesting. Ardinning is a SWT reserve.

I used Trails on my phone to record a kml and gps track. The kml file was imported int oa new google map. I uploaded the photos it was then just a matter of dropping on some pins, filling in a title and pasting in the url to the image file.


View Ardinning in a larger map

Another approach

Over the last few year I’ve played with developing a workflow for creating maps like this using the GoogleMaps API. For this I use SuperCard, a mac scripting application. The project allows me to import a gpx file exported from Trails, get exif data for some pictures, iPhone photos have location data imbedded (It also lets me add locations to other pictures by comparing the time taken with the gps file). It then exports a gpx file which I upload to this website and a php file created a map.

Here is the Ardinning Walk map 120303 Ardinning and a whole set of Mapped Walks. In my opinion this has a few advantages over using google maps, you can embed audio & video, and the popup boxes link in sequence. It is also a faster to produce. Obviously it has the disadvantage of being a wee bit trickier to set up.

I’ve a fair number of blog posts going into this in a bit more detail: tagged googlemaps.

But what is it good for?

I think these sort of maps add another dimension to telling a story or presenting information. helping to tell a story in space as well as time. I can see this being incorporated into all sorts of class room projects, either for mapping learning experiences or creating fictional maps. This one The Kidnapped Trail – Google Maps is a great example of the possibilities.

A little bit of DS106

It loks like I can kill two birds here: Google Maps Story — MISSION: DS106

Black Hole

I did the Banner assignment where you design and make a new banner for your word press. For this assignment I used Gimp to make a little spacey image of Jupiter and Mars with a nebula annihilating black hole in the back ground

For Jupiter I used the elliptical tool to make the planet then I selected it and bucketed some orange in. Then I used the paint brush to draw yellow  lines for an atmospheric effect. I did the same for Mars and Jupiters moons. The little asteroid belt are air brush points. I used purple on the gradient tool set to Aneurism to make some neat plasma jets out in the distance. I smudge them around to make a cloudy nebula effect and added a little black hole in the center.

Mongolian Art

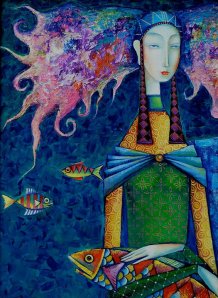
So for those of you who noticed I recently found this artist online that I thought was absolutely breath-taking! I fought with myself over what picture, and how I should crop it so that I may use it for my banner. I hope they don’t get mad at me! I found the art here and I just wanted to show it to you all!! Here are a couple of my favorites:

This is the one that I love most, I found it breath-taking and had to choose where to crop for my banner

The actual artist’s BIO is here if you are interested in more. I wish I was not a poor student, because if I were rich all my money would go to buying paintings like this.

I think this is a DS106 Assignment “revamp your banner” I have Roundhouses here I just found inages that I liked and I set them as my banner, as you can see I have six new images! This is a WEB assignment, I think its my first WEB assignment. I was just intending to share some art, but lo-and behold I could use it for a DS106. I actually saw one of theese pictures on a friends Facebook page and wanted it for myself. I did use someone elses art, but I did create a new banner :)


Banner Revamp

Third ds106 assignment!

This is the assignment submitted by roundhouseslap , “Revamp your Banner”.

What I had to do:

“Color splash is a technique to emphasize details- you remove all color from a photo, and then restore original color to a single object.”

The image I used in my banner:

What I did: In my wordpress dashboard, I selected ‘Appearance’ and then ‘Header’. In the header page I chose an image I had from the ‘upload image’ option.

I cropped image so that it looked like this:

Then I published it!

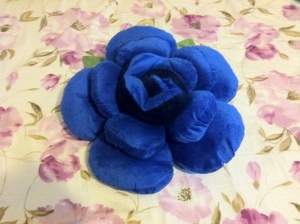
Story: This assignment was something I have been wanting to do . I came across it when searching for an assignment and thought why not give it a try! The picture used is a random photo I clicked of a blue rose cushion. As the theme of my wordpress site’s appearance is blue I thought this might look good!

Dawn and Dusk!

Change WordPress Banner

Looking for a ds106 assignment to liven up my page and saw this topic posted by RoundhouseSlap and decided to be the first one to link and do it, so it isn’t just sitting there. I also do not like the WordPress offered banner’s so I decided to upload one of my drawing’s I did last summer of a deer skull. It looks interesting and as uncolorful as it is I like the effects that I was able to work into the shading. I did the Change WordPress Banner ds106 it was pretty fun to look through my drawings again to find something I liked.http://assignments.ds106.us/submissiontags/webassignments335/

http://assignments.ds106.us/types/WebAssignments/

Google Translate FAIL. :D

Hey guys :D

Here’s my 4th ds106 assignment!!

This time, I wanted to stay away from a visual assignment because I tend to drift towards the visuals when I open the ds106 assignment page.  Therefore, I chose to do a web assignment to start my ds106 assignments for the second section!! :D

The Assignment:

So here are the directions that the creator gave us about the Google Translate Fail.

Find something in a foreign language and use Google Translate and laugh about how awful it is. Its pretty easy to do if you use Google Chrome. Just go to a site in another language and select the translate to English button when it pops up (options – under the hood – check the box that says to offer translations). I think you can also use the main google.com to translate pages as well. If its a language you know, give an explanation of what it should be and list possible reasons it got messed up.

The Process:

Since I speak Japanese fluently, I chose to look for a online article online in Japanese. I really wanted to have fun for this assignment so I chose an article from the entertainment section. I was looking through some of them but some of the article’s translation wasn’t that bad. So I kind of had a hard time finding the perfect article. But yeah, I came upon an article about a Japanese singer called Ayaka and I chose that article for this assignment. :)

The Story:

Well, since I’m writing about her, let me tell you a little bit about her.

Ayaka was born in Osaka and moved to Tokyo to pursue a singing career. She released her first song “I Believe” in January 2006. On February 28th, 2007, a new single was released (after her 4th single and first album) called “Winding Road” which was a collaborated song with a famous Japanese group called Kobukuro. On February 22nd, 2009, Ayaka married Hiro Mzushima after several months of dating. She also announced her plans to continue singing until the end of 2009, before putting her career on hold due to an illness. Now, she made her comeback and she just released her new album “The Beginning” on the 1st of February.

I bet you guys are wondering why all this information relates to the actual assignment. Well, the actual article was about her new album, “The Beginning”.

So here’s the google translate:

Just incase this is hard to read, the actual text that I got from yahoo news is:

?????????1???????????????????????????2?1???????????10?8????????13?????????????????????1????????????????????09?10?12???????????09?9??????2?4????????????????????????????????????????????????????????????4?27???????????????4????????????????????????

and the translation is:

Is (released May 1, 2) album ”The beginning” a new work and return the firstbullet of singer Ayaka, 108,000 copies sold in its first week release, thealbum debuted # 1 Oricon weekly rankings dated 13 acquired. To win thetop spot Ayaka, two years four months since the best album of dated 12October 2009 (released September 2009). Provided comments Ayaka ”to everyone who took in hand this work, I want to convey heartfelt gratitude” and. Starting with the Budokan performances on April 27, has also decidedto do a nationwide tour and the first time in four years.
This is such a poor translation for this article with such amazing news. The “real” translation should be something like this:
 The first album by singer Ayaka released on the 1st of February after her recovery, “The Beginning” has sold 10.8 million copies and was first on the Oricon weekly chart on February 13th. This achievement of hers has been one she achieved in 2 year and 4 months since her Best Album that was charted on 10/12/2009. Ayaka says: “I want to send a heart full of gratitude to all the people who took my work into their hands.” Making her concert at the Japan Budokan on April 27th as a start, she confirmed that she will be having a nation wide tour for the first time in 4 years.
I’m sorry if I got some of the words wrong but this is the best I can do right now :(  But I think everyone can agree that the google translate it self doesn’t make sense at all!! You won’t be able to understand some of the sentences in there ><
Although I think the Google Translate is so wrong to an extent that it’s funny, I always rely on it so…I guess I have no say :P

Roundhouses and Cupcakes

The Assignment

The assignment was to Revamp Your WordPress Banner. This is as simple as it sounds:

If your WordPress blog has a banner, replace it with one that you’ve made yourself instead of using a preset image from a theme.

I actually submitted it, and in hindsight wish I named it more creatively… Like “Banner Make-Over” or something.

The Process

I decided that I wanted something a little more engaging and less bleak than my default banner “Misty”. While it reminds me of the charming San D’Orian leveling zones from Final Fantasy XI, it just made my page far too pale.


My original banner image that came with the WordPress theme.

I first decided to browse the Flickr Creative Commons offerings. Just randomly browsing recent additions was getting me nowhere, so I quickly had to narrow down my search. I just got an invite to Pintrest today and have been using it to bookmark no-bake sweets for Valentines Day inspiration, so that influenced my decision. I decided to search for “cupcakes.” I had to filter through a lot of really bad photos and not-good looking cupcakes, but then I finally found one that was both delicious looking and charming:

The original link to this image is here and it belongs to Flickr user Lamantin.

For those of you who don’t browse food pictures often, this type of shot is basically the MySpace angle of sweets. It’s all in the slight tilt.

Next I had to crop the image to the correct banner size of 760×190 pixels. I’m guessing this is standard on WordPress. I just opened up Pixlr with the cupcake image and then created a “New” image and specified the correct dimensions. If you have an image that meets these measurements WordPress will use it as is. If it’s larger I’m assuming it’ll get re-sized.

Cropping the image to the appropriate banner size in Pixlr.

Following this I saved the image. I decided against adding any text directly to the image, since I can already do that above the header image through Word Press. Also at the time I didn’t feel “roundhouseslap” really fit the mood of the picture.

Here's the cropped banner.

Deciding that it would be really lazy to stop there, I decided to run it through the vintage effects editor that Pixlr had which I found when I did my original Engelbart ds106 assignment.

Adding vintage-y filters, overlays, and borders through Pixlr.

The vintage Pixlr editor is like Photoshop for hipsters, and I like it. I wanted to make the colors pop, something that added brightness and saturation… Something different from “misty.”

This is what I finally came out with.

I decided to rename my blog to “Roundhouseslap’s Cupcakery” just to fit the theme. I also ended up updating some font colors and the page’s background as well. I’m rather pleased with the end result. It’s nothing complicated, but it makes me content to look at it. I also credited the original owner of the image in my header text, since it would be showing up on every page of my blog.

The Story

I wanted to do something from the web category for a ds106 since I hadn’t touched that section yet. I saw the Revamp Your WordPress Site assignment and took an interest, but WordPress (free and without owning a domain) seemed resistant to using a 3rd party layout. That said, I also rather liked my current layout. I just thought it needed some personal touches. So I went ahead and submitted an assignment for making your own header. I think the header image is a very strong and important part of your blog. It’s said that a picture is worth 1000 words. Keeping that in  mind, that means your blog’s header image tells people what your blog is about and who you are, before they ever read anything. It’s like your first paragraph, but in non-paragraph form.

With that submitted I decided to get started right away on finding images. Cupcakes seem kind of counter-intuitive (well, at least if you know me well). I actually adhere to the primal/paleo diet, which I’ve mentioned in previous posts, which generally means gluten-free, dairy-free, an avoidance of added sugars, etc. Basically, when all is said and done, cupcakes are the ultimate evil in a primal diet. Still, I absolutely love sweets, baking, decorating, and cupcakes. I especially love browsing really pretty blogs about them.

While my blog is most definitely not about cupcakes, at least this layout allows me to pretend. It’s kind of hard to bake when you don’t own an oven (<3 Tokyo).

Web Assignment: Revamp Your WordPress Site

  I decided to choose this as my first assignment because I was going to do it anyway, so two birds with one stone, etc… It took me a while [...]

DS106 Assignment ~Way Back Time Machine~

The Assignment: When I was choosing what to do for  my first DS106 assignment, I found this assignment but nothing came up on me mind to connect with Alan Turing at that time. So I thought to myself this is a great opportunity to do it. Way Back Time Machine  was my second challenge for the DS106 assignment. The assignment instructions tell us to:

Using the Way Back Time Machine website on Internet Archive, take screen shots of a favorite website overtime. Then, look at how the website has changed for better and worse. Blog about what makes a website effective and how that changes.

Process: First of all I did a google research on Way Back Time Machine website as I never heard of it. I got really surprise after founding out what this service is all about. Basically, this website is an Internet archive where allows users to access to web pages of the past. Amazing right? I just didn’t imagine of such website existences. My next step was to search for a website that impacts my readers and myself. I started with Facebook but unfortunately, they did not have the record for Facebook which I found really weird and got disappointed as it is one of the most popular websites on the Net. I look for Youtube, Google, Wikipedia, Yahoo! and other services and actually was pretty fun looking at how these websites have developed through the time. However, non of these websites impressed me a lot. There I was lost thinking of a known website that can be attractive and that can had a radical change. I was at the computer lab sitting with my boyfriend, and he was looking at the NBA website. He got interested in my work, so I looked up at the NBA website on 1996 and it was just shocking. He was surprise as much as I was when we saw the differences. Instantly, I knew that this was the perfect website to use. Simply I looked at the recent website of NBA and took screen shot same as for the old one. Here I learned a new thing about the computer. I do not know if its embarrassing or not about not knowing the existence of the ScreenShot. Well, I did not know and the first thing that came to my mind was taking picture of the screen with my camera (Yeah thinking it now, it is really embarrasing). When I knew the existence of that button told by my boyfriend I was embarrassed and realized that there is so many stuffs that I do not know of the computer and if I knew it before, my life using the computer will be way more easier. After, taking screen shot, I use Gimp to modify each image.

Story: Here I am going to blog about how the website improved during 16 years.

According to Way Back Time Machine this website is a record of the October 22nd 1996.

As everyone can see it is very simple, but what surprise me about is that it has actually colors and a image like the one on the top of the website. When I was looking at past websites like Google and Wikipedia, they did not have any color or image at all, just letters. Also, it impressed me that this website have the category of buy online and live on the Internet. It was not too simply like the others websites on 1996. In my opinion it is quite a pretty well organized website for at that time.  Now, lets have a look at the recent website.


As everyone can imagine, the picture below is the recent NBA website taken on January 25th 2012. One of the obvious changes in the website is the quantity of information that the website provides

?It shows how many games are going to play and the time schedule of it of that day, the day before and the day after.

? The top of the website provides lots of categories where a user not only enjoy looking at the news but also reading blogs, watch videos or get informaion about the players.

?At the top and bottom there is a store link. The previous website had this category however, it has improved by putting pictures and do propaganda like “get 30% off”

? At the center you can enjoy the top news and pictures for the date. Previously, it had one picture, however it has improved by showing several of them as a slide show

For the top of the website I think those are the main points, now let’s have a look at the center of the website

? A variety of videos categorized

? Information about the website writters and their pictures

? Users are able to participate through voting

Mainly videos are shown up in the center of the website

At the end of the website, not only votes, galleries are avaiable but also, access to NBA with other services such as Twitter and Facebook are shown to follow.

Some informations provided here you can find it at the top of the website as well as at the center. I imagine that the purpose of this, is to give access to mainly information at anywhere of the website the user is on.

Another difference with the old website is that, here you can see that each category is divided with a frame which make the users easy to read. Also, as the recent website has more variety. The old one contains information such as news, schedule, results as well, however the recent one made it easier for the readers to have a look at the main information in the top page without having to wait for page to open. One can enjoy exploring at the website with the new one and enjoying it better. This shows how the technology has advanced and how throughout the time, websites became easier to use.

I found a website talking about the Modern Websites Using HTML5. Apparently, HTML 5 is the fifth major revision of the basic language of the World Wide Web. It is still in experimental mode but already used by many web developers for its progress, improvements and benefits. According to HTML5 Tutorial things such as 2D/3D graphics, web applications and more awesome new technology will introduced on the web. I wonder how the future NBA website will look like in 50 years :)

Imbalance2 WordPress Theme by WPShower

Since I was going to be doing it anyway, I figured I’d submit a post for the Web Assignment “Revamp Your WordPress Site” (Web Assignment 327). The assignment is to:

locate, download, install, and activate a WordPress theme that is not offered as an easy install through the WordPress Free Themes Directory.

You can see the results of this assignment live on this very blog already! I chose to go with the Imbalance2 WordPress Theme by WPShower.

Where I found and how I installed the theme can be found further down.

Where did I find the theme?

A favorite site of mine is SmashingMagazine, a blog for web designers and developers. SmashingMagazine periodically reviews WordPress themes and I came across a compilation post that contained this one. I love it and the way it allows you to highlight the main image that represents your post, which seems perfect for ds106.

How did I install the theme?

  1. The first thing I did was to download the theme’s .zip file from the theme page.
  2. Then I logged into my WordPress admin page (the URL is www.yoursite.com/wp-admin).
  3. Then I navigated to Appearence -> Themes.
  4. Then I clicked on the Install Theme tab.
  5. Then I clicked on the Upload link.
  6. Then I clicked on the Choose File button. From here, I found and selected the .zip file I downloaded earlier.
  7. Then I pressed the Install Now button.
  8. The theme then uploaded and WordPress installed it.
  9. Then I clicked the Activate link.
  10. Then I smiled and began customizing the theme a bit under Appearence -> Theme Options.

Different themes have different customization options, so I won’t go over that in detail here, but play around with the theme you’ve downloaded to see what you can do. Feel free to post questions and I’ll see if I’m able to help.